

Small Gardening Tools
* Comfortable, light & easy to use,
Remember that with close-up gardening jobs, tool size is less important, and the design of the tool head and handle are very important. And I've found the small gardening tools described here simply make gardening a pleasure to do. (Get information on larger garden tools - forks, hoes, rakes from this link.) - Below you'll discover the small gardening tools and methods I use to tackle these jobs easily:-
Effective Specialised Tool Heads
Unfortunately garden tools manufacturers don't seem to have advanced BOTH tool head AND handle design in one tool. They need to combine their Patents because it's usually one or the other.
But if you are disabled - have arthritis or reduced grip - I suggest that you seriously consider the information on ergonomic handles detailed below.
|


|
After edging the lawn make use of the Culti-Weeder to tidy the small borders and edges and to weed around plants.
The cultivating prongs lift the soil to cultivate and you can drag out the fibrous roots of annual weeds. Pull the culti-weeder away from your plants and you won't damage their roots. I like to have this all-around weeder ready-to-hand and especially for doing small borders after the lawn edging. Culti-Weeders in the U.K. |

The Grubber - works like your own hand
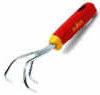 You can get a firm and comfortable grip on the chunky handle of this tool. The grubber feels like a sturdy extension of your hand. Its down pointing prongs drag out the annual weeds, debris, and clean off the soil surface.
Pull the grubber away from your cultivated plants and you won't damage their roots.
These Tools are Pushed Straight Down and Twisted, Levered or Drawn Out
Extracting Weeds - Tidying Path Edges, Pavings, Cracks and Lawn Weeds

|
<< On the left the Weed Extractor slices lateral roots as it's pushed in next to the weed. Twist and pull, and the flanges hook the remaining lateral roots and extract your weed.
For blocks and paving, and path edges use the sharp knife and hook on the right. You can cut and lever out plants that have rooted in crevices. Joint Scraper. >> |

|
Planting Tools

The Planting Knife >>
The handle and narrow head of the Planting Knife are designed to dig straight down deep. Use it to lift small tap roots: carrots, radish, beetroot; for planting into small spaces, in the rock garden, and especially with pots and containers. You can also use it in lawns to cut out weeds.
<< Or try the soil scoop...
Soil slips off a trowel when you dig, but this alternative curved profile holds onto earth. It's easily removes earth from holes with a straight lift. A serrated edge cuts through a hard root ball and dried compost. Your Soil Scoop also makes easy work of filling and planting containers and hanging baskets.
Bulb Planter
Some bulb planters are quite expensive but I like this one >>The blades penetrate the soil when you twist and push. You extract the soil core and release soil plug back into the hole by squeezing the button.
Although the Planting Knife will do for small bulbs, when you have lots of bulbs to plant a bulb planter makes sense. You can also get long-handled bulb planters for when you want to make all the holes before doing the planting. It helps to visualise the arrangement. Bulb baskets are very useful too. You can easily lift and keep your bulbs tidy.
These Tools are Hacked Downward, Levered and Drawn Back
The Planting Hoe / Small Mattock
|
Use this double headed hand fork / mattock to break into tough and rough ground. You can hack through weeds debris and hard soil surfaces. This tool easily works around and between plants.
Also use the mattock to make planting holes and to lift small plants such as young onions, beetroot, radish, lettuce etc... especially plants where you don't want to break the roots up. Prongs can be used to lift small fibrous rooted weeds and flower plants; also to cultivate soil and prepare drills before sowing.
Find variations of this double headed planting hoe from these links. |
Stab Forward with a Low Angle of Attack, Push Down to Lever and Lift Earth
- A straight handle makes hard work of low angle weeding and cultivating.
 The Z-shaped handle attachment provides added leverage. Drive the tool forward with a low angle of attack, then push the handle down to lift, weed and cultivate. This works best with a flat tined fork.

| Round tines like those illustrated right are good for rock gardens where they are used at a steeper angle. Gardening Trowel and Fork. |
The handle below clunk-clicks onto the tool heads described here. (Note: some tools come complete with handle)

This handle belongs to the versatile multi-star system that makes it easy to carry and store several gardening tool heads with one handle or use the same specialised tool heads with different length handles.
 The Daisy Widger illustrated right >>
is a surprisingly effective gardening tool.
And this one has a very comfortable contoured handle. The latest design of Wolf garden tools (not illustrated here but on the links) also have countoured handles.
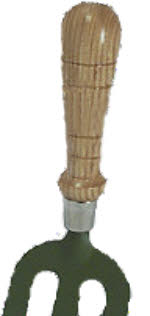
The Typical Bulbous Handle With A Waist
- (like those used by garden gnomes).
This type of handle may feel comfortable to hold - but... ...
on a trowel handle the down-facing contour becomes harder to grip when you push it down into soil.
However, for tools that you draw and pull
e.g. hand grubbers, claws, mini rakes;
this is a good shape to hold onto.
Like on this Onion Hoe...

These Tools Are Push / Pull and Lift
Preparing the Ground to Sow Seed and Plant
The Soil Crumbler or Mini Rake
 This mini crumbler or seed rake is surprisingly good at breaking soil down ready for seed.
You can draw it horizontally and at various angles, or incline the head down and rake sideways. Use this to make wide seed drills for cut-and-cum salad leaves... And this garden tool doubles as a grubber.
You'll find more tools like the mini rake on this link.
The Gardening Tools I Use Are Here For You To Try...
|
But you can get more advanced ergonomic handles for a limited set of tool heads see below...
A BENT WRIST LEADS TO STRAIN
Traditional garden hand tools have straight handles mainly because they're easier to make. But when working with hand trowels and forks this causes the wrist to be bent down. So why not bend the tool handle into a vertical instead. New materials make it possible.Comfortable Ergonomic Handles Avoid Stress
 This picture illustrates the natural grip and posture of your hand. These are the strongest and most comfortable holds that you can make.
 Now compare this with a typical posture when holding a straight tool handle. You see how you have to bend your wrist down to align the tool head for the job. Then you have to apply force through your bent wrist. You'll find a more comfortable alternative below...
Traditional tool handles have been designed because they are easy to make by turning on a lathe. The spike at the base of the tool head is knocked straight on and secured with a ferrule. Unfortunately we've simply come to accept the discomfort as necessary when doing gardening.

Easi Grip Gardening Tools Fork |

|

|
| Easi Grip Garden Tools Trowel | Easi Grip Garden Tools Cultivator |
Notice that your push and lift action with the trowel and fork has added leverage due to the z shape attaching head and handle. The 3-pronged cultivator is inline with the tool head because it is worked by pulling and lifting. All these tools give you a strong grip and let you apply force in the direction you want it.

...and you can get tool handles to clip onto the side of long handled tools.
- Style May Not Be The Most Appealing,
- Handling May Need A little Getting Used To,
- *But Why Let That Stop You --- When You're Enjoying Gardening
- **These tools are for everyone
Specialised Ergonomic Gardening Tools Are
Available For You Below...
|
|
|
|
Easi Grip Garden Tools Trowel
Easi Grip Garden Tools Cultivator Easi Grip Garden Tools Fork Easi Grip Add-on Handles for long-handled gardening tools |
Easi-Grip Gardening Tools - U.K.
Easi-Grip Add-on Handles - U.K. |
| Please wait for above to load... | Please wait for above to load... |
|
|
EXTRA... ...
Finally here are a few cultivators that are very popular and well recommended by other gardeners.
Popular and Well-Recommended Gardening Tools
|
|
|
|
Korean Style Hoe
Onion Hoe sometimes called the Half-Moon Hoe |
Offset Hoe
Onion Hoe sometimes called the Half-Moon Hoe |
-
You'll find lot's more pages of information on other gardening tools by following these links:-
Get more information about weed problems and how to tackle them.

|
|
|
My Neighbour's Garden
-
Do you run a gardening website
- with information to interest my visitors?
To set up exchange links from/to
suitable pages - click here.

